Showing posts with label blog. Show all posts

Thursday, December 15, 2011

my Christmas present to myself (and my family and God)

I'm giving myself a blogging vacation for Christmas! I need to re-focus on what Christmas is all about and enjoy time with my family away from the computer.

I feel like God has really been working on my perspective lately in my alone time, in my conversations with my Sweets, and through a book called Crazy Love that our Sunday school class is reading right now. I want to share a little bit about that with you and how it affects this blog.


I used to try to make time to read the Bible and/or pray in the mornings, and now I find myself waking up and getting on the computer right away. I want to see what's happening in Blogland, check my Google Analytics stats and RSS subscription numbers, browse Pinterest, read through emails, etc. My priorities have obviously shifted and I don't think it's for the better.

When I stop to think about all the ways I could be spending my time, I want my choices to please God. I know that it is entirely possibly to blog for the glory of God, and I hope that some of the things I've done on this blog (like this or this) have made God happy.

I also want my choices to honor my family. We have made sacrifices for me to be a stay-at-home-mom. I want to prove that decision right and I humbly confess to you that I may do all the SAHM things (cook, craft, love), but I'm not good at just being with Little Sweets. As she gets older, I want her to remember that her mommy spent quality time with her and didn't "just a minute" her all the time.

I am also refocusing some of my time to be more intentional about teaching Little Sweets. I'm pre-preschool-homeschooling. Is that a thing? =) I've collected tons of ideas on my Preschool at Home board and I'm starting slowly. It's so exciting to see the tangible rewards of what I invest in her.

So I'm taking a step back from blogging.

I'm not going to delete or disown my blog... I'll probably be back to post things here and there. I'm definitely keeping up with my Etsy business for the reasons I mentioned here. But you won't be hearing from me as often on my blog.

If you want to find projects that have been popular on my blog thus far, please check out My Gallery!

Thank you to all my awesome readers and followers who have encouraged me, taught me and given me more confidence in my life!


Are you giving yourself anything for Christmas?

Friday, November 4, 2011

How to burn your RSS Feed and set up Subscribe by Email - Tutorial

Pin It  
I finally figured out (with help from other bloggers' tutorials) how to burn my RSS feed and get email subscriptions set up the way all the cool kids do. And I'm going to share it with you so you can do it, too!

RSS Feed for SweeterThanSweets

Now you can subscribe to my blog via email! See the box in the right sidebar underneath all my *awesome Followers? (*hint, hint... Click here to follow SweeterThanSweets!)


Okay now go on and type in your email address so you can get all my posts delivered to your inbox. It's that easy! My favorite part about the email is that the photos show up even bigger than what you're seeing here on my blog. Here's a little sneak peek of what the email looks like:


I've been blogging for 10 months now and until a a short while ago, I knew only the basics about an RSS feed. Previously, I had my RSS feed link to the default url: http://howsweeteritis.blogspot.com/feeds/posts/default?alt=rss or http://howsweeteritis.blogspot.com/feeds/posts/default?alt=atom (change the text in blue to your blog's name if you want to see your default feed).

Now when you click on the RSS icon over on my sidebar, it redirects you to my burned RSS feed, http://feeds.feedburner.com/sweeterthansweets so you can subscribe in your reader of choice if you'd rather not get emails.


If you have your own blog but are completely confused by all this "RSS/burning your feed" talk (like I was a few weeks ago!) here are some tutorials from more tech-savvy people than me. (Remember how I told you how little tech speak I know?) Note: Go through these tutorials in the order provided.

What is RSS?


Technie Mania's RSS Guide for Beginners

FeedBurner FAQ from Google

Now burn that feed!


Technie Mania's Guide to Burning your Feed

or see Lauren Wayne's article on using FeedBurner (specifically, the How section)

another option: this YouTube video tutorial by MsIleneSpeaks

My feed is burned. Now how do I use it?


KludgyMom's overview of how to use FeedBurner (see especially the Publicize section regarding setting up emails)

Lauren Wayne's advanced guide to using FeedBurner (the last part of section #1 regarding Twitter is very helpful)

What is "reach"?


Contentious.com's explanation of what Reach really means

FeedBurner for WordPress


Solutions for WordPress provides instructions for WordPress bloggers


If you know of another helpful tutorial or have any other questions, I'd love to hear from you in the comments. And don't forget to sign up for an email subscription to SweeterThanSweets! =)

Friday, August 26, 2011

How to create a gallery or table of images on your blog (Tutorial) & my new Project Gallery

{UPDATED--see below!}

Did you notice my new Gallery page in my navigation bar? I thought it might be nice to have a Pinterest-style project gallery where you could see my blog posts organized by theme and with thumbnail images. This way you won't have to hunt through the tags or wonder what in the world is Rainbow Ice?  since you can see it all at-a-glance.

Here are the first two lines of the gallery:

Project Gallery by Tricia @ SweeterThanSweets


Right now it has my most popular posts in 4 of the 8 categories I usually blog about (Craft, Travel, Learn, Love, Cook, Give, Believe and Inspire). The posts that get the most interest are in the Craft, Travel, Learn and Cook categories so I started with those.

If I add the other 4 categories to the Gallery, could I do away with the "Blog Archive" widget and the "What Am I Talking About?" tag cloud? If you were a first-time visitor to my blog, would you be annoyed that those were not in the sidebar, where you'd usually look?

What do you think?

Okay, now on to the tutorial!

How to create a gallery or table of images:

Want to create your own table of images? You can use a table for your own Project Gallery Page or just to put several images side-by-side in a blog post. (I originally found the code here and modified it to my needs.)

Note: This code will give you clickable images that open in a new page/tab. The caption is not linked to anything and the image is not linked to the original image (which is the default set-up, at least in Blogger). It sets images to be 120 pixels wide, which was the biggest they could be for the width of my blog. Change the width if needed.

Copy and paste the html below and change the blue text accordingly:

<center><table><tbody>
<tr>

<td><table align="center" cellpadding="0" cellspacing="0" class="tr-caption-container" style="margin-left: auto; margin-right: auto; text-align: center;"><tbody>
<tr><td style="text-align: center;"><a href="yourwebsiteurl" style="margin-left: auto; margin-right: auto;" target="_blank"><img alt="yourimagetitle" border="0" src="yourimagesource" width="120" /></a></td></tr>
<tr><td class="tr-caption" style="text-align: center;">yourcaption</td></tr>
</tbody></table></td>

<td><table align="center" cellpadding="0" cellspacing="0" class="tr-caption-container" style="margin-left: auto; margin-right: auto; text-align: center;"><tbody>
<tr><td style="text-align: center;"><a href="yourwebsiteurl" style="margin-left: auto; margin-right: auto;" target="_blank"><img alt="yourimagetitle" border="0" src="yourimagesource" width="120" /></a></td></tr>
<tr><td class="tr-caption" style="text-align: center;">yourcaption</td></tr>
</tbody></table></td>

<td><table align="center" cellpadding="0" cellspacing="0" class="tr-caption-container" style="margin-left: auto; margin-right: auto; text-align: center;"><tbody>
<tr><td style="text-align: center;"><a href="yourwebsiteurl" style="margin-left: auto; margin-right: auto;" target="_blank"><img alt="yourimagetitle" border="0" src="yourimagesource" width="120" /></a></td></tr>
<tr><td class="tr-caption" style="text-align: center;">yourcaption</td></tr>
</tbody></table></td>

<td><table align="center" cellpadding="0" cellspacing="0" class="tr-caption-container" style="margin-left: auto; margin-right: auto; text-align: center;"><tbody>
<tr><td style="text-align: center;"><a href="yourwebsiteurl" style="margin-left: auto; margin-right: auto;" target="_blank"><img alt="yourimagetitle" border="0" src="yourimagesource" width="120" /></a></td></tr>
<tr><td class="tr-caption" style="text-align: center;">yourcaption</td></tr>
</tbody></table></td>

</tr>
</tbody></table>

</center>


{UPDATES}
1. I just repositioned the code above so that it's more clear. Each "paragraph" above represents and individual image. So if you want to add an additional image, copy and paste the following section to add one (or delete this section to have only 3 images per row... just make sure to adjust the widths of each photo to fit your blog's width accordingly):

<td><table align="center" cellpadding="0" cellspacing="0" class="tr-caption-container" style="margin-left: auto; margin-right: auto; text-align: center;"><tbody>
<tr><td style="text-align: center;"><a href="yourwebsiteurl" style="margin-left: auto; margin-right: auto;" target="_blank"><img alt="yourimagetitle" border="0" src="yourimagesource" width="120" /></a></td></tr>
<tr><td class="tr-caption" style="text-align: center;">yourcaption</td></tr>
</tbody></table></td>


2. Also, here's more info on what the blue text means:

Image Title: This can be anything you want. Keep it relevant for SEO purposes. It's also the name that will show up if, for some reason, your image doesn't load on someone's browser. I usually end my image title with "by Tricia @ SweeterThanSweets" if it's a photo that I took.

Image Source: This is the url where the image is located. They all start with http:// and end with .jpg. If your image is hosted on Photobucket or Flickr, you can find the url when you go to the "share" options. If it's a photo that you're uploading onto Blogger, upload into a draft post as you usually would, then switch from Compose to Edit HTML mode. Look for img src=" or just src=" and what follows the quotation mark is the part you need. You don't have to actually publish the blog post to get this code. Once you upload to blogger and get the image source, you can delete the draft if you don't need it. The image was actually uploaded to the internet whether the post was published or not.


Let me know if you have any other questions and I'll update this post if needed!

Friday, August 12, 2011

Obsess: To haunt or excessively preoccupy the mind.

Obsess: To haunt or excessively preoccupy the mind.

I have a few obsessions lately.

Prioritize Your Obsessions Print by The Decorium Studio

What am I obsessed with, you ask?

Google Analytics logo
Google Analytics: I know you think you're stalking me, but I'm stalking you, too. On Google Analytics, I can see where you live, what time of day you're on my blog, what pages you're looking at, and much more (insert evil laugh here). Check out how to set up and use Google Analytics here--my second blog post ever!

Pinterest Boards by Tricia @ SweeterThanSweets
Pinterest: Who doesn't love great methods of organization? Learn more about Pinterest here, or find and follow me on Pinterest now. I also love seeing my blog or my Etsy shop Pinned. Want to see whether you've been Pinned? Change out my url for yours: http://pinterest.com/source/howsweeteritis.blogspot.com/

Features: Yes, I'm addicted to getting featured on all these amazing blogs. Want to get yourself featured (read: Free Advertising)? Read this post--updated last week with new sites!

Nautical Inspiration Board by Tricia @ SweeterThanSweets
Being inspired by others: Whenever I see a few objects that I love, I make an Inspiration Board or an Etsy treasury. It's so fun to find crafts, projects and items and to share them with others. Getting featured on Etsy's Front Page only fueled this obsession.


Last but not least, I'm obsessed (probably not the right word for it) with my Little Sweets. I have been obsessed for the past 2 1/2 years but for some reason, I'm more aware of it lately. I thought I stared at her for hours on end when she was a newborn, but I think I do it even more now. I am seeing her little personality come out and I am watching her learn and I am loving it all. She is so amazing and I still can't believe that I can fall more and more in love with her each day.


Those are the things I'm obsessed with lately. Now all I have to do is prioritize my obsessions, like the art print you see above...

What are you obsessed with?

(P.S. - Share your Pinterest page in the comments and I'll follow you!)

Saturday, August 6, 2011

Sprucing Up the Blog

I just finished some much-needed sprucing up of my blog. Did you notice?

Here's my favorite change: New social media buttons! What do you think?

EtsyFacebookPinterest
FlickrE-MailRSS

I ordered the buttons from MoxieTonic on Etsy for $2. Yes, $2.00. She's just starting her shop so she's offering sets of 4 buttons for $1 each until she gets to 100 sales. Get over there soon if you want your own!

Back to my blog sprucing. I've rearranged a few things on my blog and hopefully it's easier to find things now. I widened the layout and merged the two sidebars into one.

I also wrote an "About Me" page for you to learn more about my blog and myself. I linked to some of my (and your!) favorite blog posts.

And finally, one other big update I've recently finished:

I'm always finding new amazing blogs that will feature crafty bloggers for free (!) advertising. I wrote this post back in April but I just updated it yesterday with a bunch of new blogs I've found. If you're a blogger, you'll want to read this post on how to get yourself featured on high-profile blogs. If you're a blog reader, check out the list and maybe you'll find some new blogs to bookmark!

In case you're wondering, I have yet to spend a dime on advertising... the blogs on this list have gotten me most of my new, amazing readers and followers--that's you! Did you find me from one of my features?

I hope you like the changes. I'd love to hear your feedback on the design (too wide for your screen? Too narrow?), the buttons (why am I not on Twitter yet?), and the About Me page (anything else that you'd like to know about me?)

Monday, August 1, 2011

WonderDads Giveaway Winner

Thanks to all who entered the WonderDads Book Giveaway!


And the winner is...


Congratulations, Rebecca! I'm contacting her now and I can't wait to find out which of the WonderDads books she is going to choose. (Entries were numbered chronologically and additional entries that did not have separate comments were added to the end.)

Rebecca is a Literacy Specialist who shares her knowledge and passion for literacy at her blog, The Joy of Literacy.


If you are a teacher, parent, or homeschooler, this blog is for you! Rebecca provides teaching tips, kids' book reviews, links to other literacy resources and more... please check out The Joy of Literacy blog and let her know that I sent you.

Isn't it fitting that the writer of a literacy blog would win my book giveaway?

Thanks again to all who entered to win and who shared stories of why their dad or husband is a WonderDad!

Check out this list put together by WonderDads of The Best Blogs to Tell your Wife About... and guess who's on the list. Me! (In case you're wondering, my blog would've been on the list whether or not I hosted the giveaway for them.) It's always an honor to be featured by others. Thank you, WonderDads!

Friday, July 22, 2011

Art Smock

Little Sweets and I have been doing lots of arts and crafts lately. I basically tell her, "You will be crafty, whether you like it or not."

Just kidding (mostly).

Anyway she needed an Art Smock so we could really start getting messy and I couldn't find any I liked, so I made her one. Here it is:

Art Smock by Tricia @ SweeterThanSweets

I love how it turned out and I was so proud to have finally mastered the art of sewing bias tape, which I'll talk about more a bit later.

I learned how to make my own pattern for an art smock that would fit Little Sweets from this tutorial over at Prudent Baby. I didn't add the cute pocket but I changed it up a bit with a tie back closure using the extra bias tape I had (I needed 2 packages).


Art Smock by Tricia @ SweeterThanSweets

Back to the art of bias tape. I finally mastered it thanks to Angry Chicken's video tutorial on the no-swearing bias tape method. I think everyone should check out that video tutorial, whether you plan on sewing bias tape or not. It's hilarious.

I learned a lot from the video tutorial, but the best tip was folding the ends of the bias tape under to give it a nice finish on the corners.

Art Smock by Tricia @ SweeterThanSweets

And this beautiful oilcloth fabric? It's Passion Lily by Amy Butler, which I purchased from Oilcloth Addict on Etsy. You can find tons of great oilcloth fabrics on her shop and even some chalkcloth (remember my post on Chalkboard Inspirations?).

Once Little Sweets' Art Smock was done, we had to try finger painting for the first time. This is a girl who does not like being messy. It took about 10 minutes of me finger painting before she dared touch the paint.

I really like how this project turned out and I'm thinking about Christmas gifts for nieces, nephews and friends... if any of my loved ones are reading this and your kiddos need their own Art Smock, let me know.  If I start on them now, I may even finish them before Christmas.

Monday, July 11, 2011

Chalkboard Inspirations

Although I haven't tried it for myself yet, I am loving the idea of chalkboard paint. I've seen so many great uses online but I've chosen the most unique creations to show you!

Chalkboard Wine Bottles by Ruthi Auda

Chalkboard Headboard by Shelterness

Chalkboard Tins by The Country Chic Cottage

Chalkboard Backsplash by The Elefanta

Chalkboard Pillow by Infarrantly Creative

Chalkboard Blocks To Go by The Sleepytime Gal

Chalkboard Family Center by House to Home

Chalkboard Pumpkins by Your Home Only Better

Chalkboard Globe by Halligan Smith

Chalkboard Shirt by Dukes and Duchesses

What have you made with chalkboard paint? Or if you're like me and haven't used it yet, what do you want to make with chalkboard paint?

Monday, June 27, 2011

Korker Cake Banner - Tutorial

In case you missed my guest post over at The CSI Project, here's my tutorial for a new kind of cake banner, a Korker Cake Banner... it's a fun and festive cake topper for any celebration, no cake decorating skills necessary!

Korker Cake Banner Tutorial by SweeterThanSweets


What you need to make a Korker Cake Banner:

Korker Cake Banner Tutorial by SweeterThanSweets

grosgrain ribbon in any width (I used 1/8" and 1/4", 1 spool of each color)
dowels (1/4" work best, buy these at craft or hardware stores)
wooden clothespins
cookie sheet
spray starch (optional)
lighter
embroidery floss or string
straws or chopsticks
hot glue or other adhesive
frosted cake

The first thing we're going to do is curl the ribbon to look like korkers. Korker bows are those adorable hair bows with curly-cue ribbons:


Preheat your oven to 275 degrees Fahrenheit. Check to see if your dowels will fit in your oven. If not, cut the dowels to the right size.

Take one end of ribbon and wrap it around a dowel a couple of times. Then secure it to the end with a clothespin.

Korker Cake Banner Tutorial by SweeterThanSweets

Start wrapping the ribbon somewhat loosely, then push it upwards to get as much ribbon on the dowel as possible without overlapping the ribbon.

Korker Cake Banner Tutorial by SweeterThanSweets

Keeping wrapping and pushing together until you get to the end of the dowel, then use another clothespin to hold it on. Repeat with as many ribbons as you want.

Korker Cake Banner Tutorial by SweeterThanSweets

To help the ribbon keep its korker shape, spray with some spray starch (optional). Then place the dowels on top of a cookie sheet and bake in your preheated oven for 25 minutes.

Korker Cake Banner Tutorial by SweeterThanSweets

Take the cookie sheet out of oven and let ribbon cool on the dowels, then spray with more spray starch. When they are cool and dry, start unwrapping carefully so as not to tangle or otherwise mess up the cute korker shape of the ribbon. I twist it in the opposite direction to loosen and take it off the dowel little by little.

Korker Cake Banner Tutorial by SweeterThanSweets

Now you want to pass a flame quickly over the ends of each korker to seal and prevent fraying. My ribbons turned out to be all different lengths since my dowels were different lengths but I like the look of it.

Korker Cake Banner Tutorial by SweeterThanSweets

Lay all the ribbons out on a flat surface. Slide a piece of string or embroidery floss underneath one side, making sure to catch all the ends of your ribbons. Then tie a knot on one side. (I found it worked better to just tie one side of the ribbons, then start attaching it to the cake, then tie the other side.) Don't cut the string.

Korker Cake Banner Tutorial by SweeterThanSweets

Now put your straws or chopsticks into the cake at whatever angle you want...just be sure they're in the cake deep enough to support the weight of the ribbons (trust me, you'll know when you start attaching the ribbons if they need to go deeper).

Korker Cake Banner Tutorial by SweeterThanSweets

So that the string doesn't slide right down the straw, put a dollop of hot glue at the top of each straw. I let it dry and used the dollop just for the knot to rest on, but you could just glue the knot right on there to really secure it to the straw. Attach the first side of ribbons to one straw and try to keep the other end of the ribbons away from your yummy frosting.

Korker Cake Banner Tutorial by SweeterThanSweets

Once the first side is on the cake, you'll be able to tell where the other knot will need to be. On my first attempt, I tied both knots ahead of time and ended up cutting one out and re-doing it once the first side was on the cake.

Now tie the other ends of ribbon with your string and attach it to the second straw. Trim (and heat seal) ribbons again if necessary. Ta-da!

Korker Cake Banner Tutorial by SweeterThanSweets

This Korker Cake Banner was fun but it's got me thinking about other ways of decorating with korkers, too: party tables, miniature streamers hanging from doorways, garland on a kid's table... hmmm, what else can you think of?

Korker Cake Banner Tutorial by SweeterThanSweets

Wednesday, June 22, 2011

What really matters?

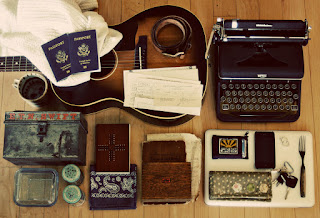
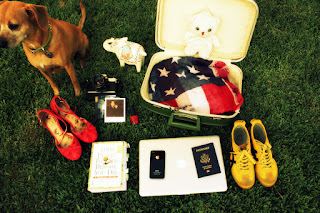
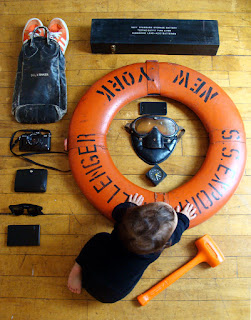
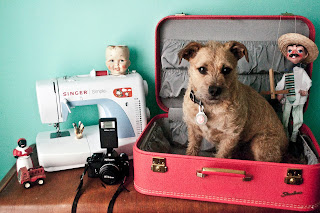
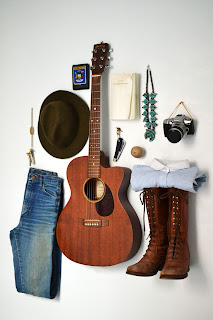
If your house was on fire, what would you take with you?

A new blog, The Burning House, asks people all around the world to take photos of their answers to this question. Here are some of my favorites:

The Burning House

The Burning House

The Burning House

The Burning House

The Burning House

If your house was burning, you would take the things that really matter. So why do spend so much time and money on the things that don't?