


Showing posts with label Spring. Show all posts
Showing posts with label Spring. Show all posts
Monday, June 13, 2011


Tuesday, April 26, 2011
Love, Watermelon
I'm so excited that spring fruits are here. We're on our third huge basket of strawberries from the farm down the street. Now I'm thinking about juicy watermelons!


My mouth is already watering.
Friday, April 15, 2011
Tissue Paper Easter Eggs Tutorial


I know I said that Easter isn't just about eggs, bunnies and baskets, but my daughter has a thing for those plastic Easter eggs. She's been on an Easter egg hunt since last year... I could never round up all of the plastic eggs at one time to put them away, so for 12 months now, we've had plastic eggs halves under the couch, in the car, stuffed in toy purses... pretty much everywhere.
It was time for some new eggs so I decided to make my own patterned plastic Easter eggs with some cute tissue paper I found at Walmart and some white eggs from Hobby Lobby for 34 cents a dozen!
What you need to make your own Tissue Paper Easter eggs:

plastic eggs
Mod Podge
tissue paper (or gift wrapping paper*)
paint brush (1" wide is best)
scissors
X-acto knife
X-acto knife
Total cost: $7 for 24 eggs
Not including scissors and X-acto, since you likely have those already.
Oriental Trading Company sells the white eggs online here, though not nearly as cheap as Hobby Lobby's 34 cents a dozen! Or colored eggs would work, too.


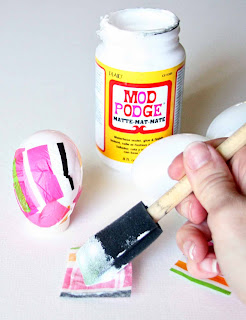
We're going to work on some "solid" tissue paper eggs first.

First, cut a strip of tissue paper about 1" wide, then cut into 1" squares. It takes no time if you stack several layers at once before you cut, but please don't measure... just eyeball it:

Brush a small amount of Mod Podge onto the back of one of the squares. No need to get all the way to the edges. Lay the square on the egg and smooth the edges down. Continue this process, overlapping the squares until egg is covered. (It will take 7-9 squares to cover one egg.)

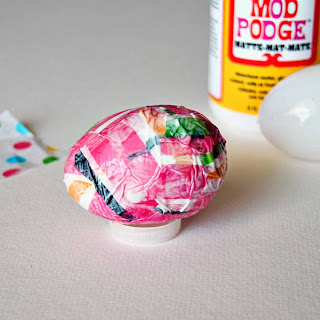
When the entire egg is covered in squares, paint a layer of Mod Podge over all of it. I rested the eggs on water bottle lids while they dried.

It will look much prettier when it's dry, I promise. =)
Now, on to the striped eggs. My tissue paper was already striped so I didn't need to buy all different colors to get this look.

Cut strips of tissue paper in whatever colors you want. My strips were about 7" long and varied in width from 1/4" to 3/4". Apply a thin layer of Mod Podge to the back side of each strip.

Starting at the bottom point, apply each strip onto the egg, smoothing the edges as you go.

I found it very difficult to apply the strips width-wise (along the egg's "equator") and much easier length-wise. But I did a few anyway for a plaid effect and I don't think Little Sweets will notice that the strips are not on straight. =) You don't want to Mod Podge over the entire egg with the strips on it, but you may need to use just a little bit over the strip itself to hold it down.
*Note: If you don't have any cute tissue paper or don't want to buy any, you can use any gift wrap you have laying around. Cut off a strip a few inches wide and soak it with water. Crumple it a little bit and carefully lay flat to dry. When it's dry, it will be soft and you can use it the same way as tissue paper.

When the Mod Podge is completely dry on your eggs, use an X-acto or other razor blade to carefully cut across the egg's equator so you can open them again.
Now let's see how long it takes the kiddos to lose all of these eggs!
Wednesday, April 13, 2011
Ladies and Gentlemen: Start Your...
Resurrection Eggs!

If you're doing a countdown to Easter with your Resurrection Eggs like we are, start by opening the first one today. Including today and Easter Sunday, there are 12 days left until Easter... can't wait until the last day when the egg is empty!
(Yes, I realize that age 2 may be too young for Little Sweets to really "get it" but it's always surprising how much they understand... and why not start teaching her the true story of Easter now?)
T5MDHQKHFF6N
Saturday, April 9, 2011
A Spring Wedding - Etsy style
If my husband and I ever got married again (to each other, of course), it would be in the spring and it would have to include Tiffany blue. Love it!

I guess if we were getting married again I wouldn't get to wear a fancy dress like this one, would I?


I guess if we were getting married again I wouldn't get to wear a fancy dress like this one, would I?
Wednesday, April 6, 2011
The true story of Easter - Resurrection Eggs Tutorial


We all know that Easter isn't just about eggs, bunnies and baskets... but it can be hard to teach our children the true story of Easter in a way that they can grasp. This year, I decided to make my own "Resurrection Eggs" to teach Little Sweets the story of Jesus' death and resurrection. You can buy these at Christian book stores or online but they're pretty simple to make yourself! This project is so easy and cheap... most, if not all, of the items are things you already have around your house.
What you need to make your own Resurrection Eggs*:

egg carton
12 plastic eggs
list of items and Bible verses
piece of bread
coin(s)
piece of purple cloth or ribbon
thorns from a rose stem
piece of string or rope to represent scourge or whip
cross
nail(s)
sign that says "This is the King of the Jews"
spear or sword (or piece of toothpick)
rock
Total cost: $1.00
Everything but the eggs should be laying around your house somewhere!
Total cost: $1.00
Everything but the eggs should be laying around your house somewhere!
*Please note that these are ALL choking hazards for young children. This is meant to be used as a teaching tool not a toy for young children.
First, you'll want to write or print up a list of the items and corresponding Bible verses. Each item represents something that occurred during the week of Jesus' crucifixion and resurrection. (You can download and print my list here if you'd rather not do it yourself. Mine also includes a sign and a cross.) Tape the list to the inside of your egg carton. You might want to paint the outside of your egg carton so your Little Sweeties don't think that the true story of Easter has anything to do with a certain brand of eggs. =)

Then, put one item inside each egg, leaving the last one empty.

To teach your children the true story of Easter, you'll open each egg and read the corresponding Bible verse. (Verses below are all from the New International Version of the Bible.) You could open up one egg per day in the 12 days leading up to Easter, like an advent calendar. Or you could open them all on Good Friday to give the kids time to process the story before Easter Sunday.

Matthew 26:26
While they were eating, Jesus took bread, and when he had given thanks, he broke it and gave it to his disciples, saying, “Take and eat; this is my body.”
2. Coins
Matthew 26:14-15
Then one of the Twelve—the one called Judas Iscariot—went to the chief priests and asked, “What are you willing to give me if I deliver him over to you?” So they counted out for him thirty pieces of silver.

Mark 15:17
They put a purple robe on him, then twisted together a crown of thorns and set it on him.

Matthew 27:29
...and then twisted together a crown of thorns and set it on his head. They put a staff in his right hand. Then they knelt in front of him and mocked him. “Hail, king of the Jews!” they said.
5. Scourge
Mark 15:15
Wanting to satisfy the crowd, Pilate released Barabbas to them. He had Jesus flogged, and handed him over to be crucified.
6. Cross
John 19:17-18
Carrying his own cross, he went out to the place of the Skull (which in Aramaic is called Golgotha). There they crucified him, and with him two others—one on each side and Jesus in the middle.

John 20:25
So the other disciples told [Thomas], “We have seen the Lord!” But he said to them, “Unless I see the nail marks in his hands and put my finger where the nails were, and put my hand into his side, I will not believe.”
8. Sign
Luke 23:38
There was a written notice above him, which read: THIS IS THE KING OF THE JEWS.
9. Sponge
Matthew 27:48
Immediately one of them ran and got a sponge. He filled it with wine vinegar, put it on a staff, and offered it to Jesus to drink.
10. Spear/Sword
John 19:34
Instead, one of the soldiers pierced Jesus’ side with a spear, bringing a sudden flow of blood and water.

Matthew 27:59-60
Joseph took the body, wrapped it in a clean linen cloth, and placed it in his own new tomb that he had cut out of the rock. He rolled a big stone in front of the entrance to the tomb and went away.
12. (Nothing)
Matthew 28:6
He is not here; he has risen, just as he said.
That last one is my favorite... nothing tells the true story of Easter better than the Empty Tomb:
 |
| Image: KruseKronicle |
Wednesday, March 30, 2011
Little Sweets' Spring Look
The title of this post may be a bit misleading, because it's not exactly Little Sweets' Spring Look but it would be if money were no object... I splurged on the shortalls, but everything else is just dreaming. =)


3. Shades of Pink Satin Flower Headband from SweeterThanSweets (had to sneak it in even though Little Sweets refuses to wear any headbands!)
5. Tall Flower Border from Uppercase Living (Stems in Green Tea, Flowers in Hot Pink)
7. Dusty the Bunny Rabbit from tzburps
Ever notice how your kids are always dressed nicer than you are? Or is it just me?
Monday, March 28, 2011
Featured on The Handmade Gift Guide
A few weeks ago, I made a treasury on Etsy, Spring Break at My House. I just found out that this treasury was featured on The Handmade Gift Guide blog, which is an awesome resource for getting gift ideas and supporting artisans. It's SO fun to be featured on a blog I love!
 |
Check out more SweeterThanSweets treasuries here.
Wednesday, March 23, 2011
Quintessential Charleston
We got back yesterday from a little family getaway to Charleston, South Carolina. Here are a few pictures that are just Quintessential Charleston (or at least the Charleston we got to know while traveling with a toddler):
**Also check out Part 2 - Where we stayed and where ate in Charleston**

 |
| We made the obligatory stop at Rainbow Row... |
 |
| ...but saw even more colors in the Spring flowers... |
 |
| ...We spent a gorgeous day at the beach.... |
 |
| ...and saw some lovey dovey horses in town... |
 |
| ...checked out Charleston from the Harbor.... |
 |
| ....crossed the Cooper River Bridge many times... |
 |
| ...enjoyed our self-guided walking tour of the beautiful homes... |
 |
| ...and the historic churches of Charleston. |
**Also check out Part 2 - Where we stayed and where ate in Charleston**
Subscribe to:
Posts (Atom)