It's Labor Day weekend... time to get outside and have some fun!
This morning, we went to a little lake near our house. They have paddle boats, rope swings and slides into the lake, a swimming pool with a 2-story waterslide, a splash pad for the little ones and a lazy river.
Little Sweets surprised us by wanting to go down the big waterslide over and over again. She's usually very cautious but she loved the ride on our laps! I lounged a bit by the pool while my Sweets took Little Sweets in the pool. See them there by the yellow slide?
Since the lake and the pools were a bit retro (that's the nice way of putting it!), I decided to put some retro flair to our photos using the Instagram app. So fun and I think it's another thing I'm going to soon become obsessed with.
What are you doing this weekend?
Showing posts with label Summer. Show all posts
Saturday, September 3, 2011
Monday, August 15, 2011
Food and Games To-Go (Road Trips with Kids)
We got back last week from a trip to Washington, D.C. (pictures are here, here and here) and it was an awesome week. I made use of my own travel trips and I got to thinking about all the creative travel products I've seen online lately, thanks to Pinterest and Etsy.
Here are some creative travel food and game ideas for the little ones:
Do you have a last-minute summer vacation planned?
Here are some creative travel food and game ideas for the little ones:
| Choose to Thrive's Road Trip Car Snacks |
| Family Chic's Feeding Kids on Car Trips |
| The Spoon Sister's Reusable Finger Spoons |
| Those Greathouse Women's I Spy Bags |
| Emilee Rose's Paper Doll Sets |
| Housing a Forest's Travel Timeline |
| WeeKnit's Finger Puppet Sets |
| Oh Dee Doh's Bubble Wrap Travel Game |
| AshleyAnnPhotography.com's DIY Notebook & Crayons |
| MomsMinivan.com's Printable Travel Games |
| Melissa and Doug's License Plate Game |
![]() |
| Cake's In-Flight Airplane Favor Printables |
| Prudent Baby's DIY Nap Mat/Bed Roll |
| JSorel's Spool Knitters: Teach Your Child To Knit |
Do you have a last-minute summer vacation planned?
Wednesday, August 3, 2011
Birthday at the Beach - Wrightsville Beach Part 2
The other day I shared a few of our photos from our weekend in Wilmington and Wrightsville Beach. Here are my favorites from the rest of our trip.
The morning of my birthday was spent at the beach. The water was warmer than it was a month ago and this time, Little Sweets declared (over and over again), "I do like the ocean!" I'm pretty sure that boogie boarding is the best way to spend a birthday morning. The last time we boogie boarded, I was 2 months pregnant with Little Sweets... oh how I've missed it! That's me out there waiting for a wave.
I just love the "East Coast-ness" of this next picture. I love the long boardwalks out to the sand and the tall grass on either side, and that you'll only find that on the East Coast.
Here's the view from the water towards the houses (with a little help from a few Photoshop Actions):
After afternoon naps and my walk around downtown Wilmington, we went out for my very special birthday dinner at The Melting Pot. We haven't been to a Melting Pot since 2003. It was time.
We got the best booth in the corner with this view of the wine racks. Or maybe it was the most secluded booth since we requested a booster seat when we made the reservation. Either way, it was awesome. And Little Sweets was on her best behavior.
We were so stuffed by the time the dessert course arrived, but of course we made room for it (we are Americans, after all).
Best birthday in a long time...probably because it was the first birthday I've spent with my husband in 3 years. It was so good celebrate with my two favorite people.
The morning of my birthday was spent at the beach. The water was warmer than it was a month ago and this time, Little Sweets declared (over and over again), "I do like the ocean!" I'm pretty sure that boogie boarding is the best way to spend a birthday morning. The last time we boogie boarded, I was 2 months pregnant with Little Sweets... oh how I've missed it! That's me out there waiting for a wave.
I just love the "East Coast-ness" of this next picture. I love the long boardwalks out to the sand and the tall grass on either side, and that you'll only find that on the East Coast.
Here's the view from the water towards the houses (with a little help from a few Photoshop Actions):
After afternoon naps and my walk around downtown Wilmington, we went out for my very special birthday dinner at The Melting Pot. We haven't been to a Melting Pot since 2003. It was time.
We got the best booth in the corner with this view of the wine racks. Or maybe it was the most secluded booth since we requested a booster seat when we made the reservation. Either way, it was awesome. And Little Sweets was on her best behavior.
We were so stuffed by the time the dessert course arrived, but of course we made room for it (we are Americans, after all).
Best birthday in a long time...probably because it was the first birthday I've spent with my husband in 3 years. It was so good celebrate with my two favorite people.
Friday, July 29, 2011
Wrightsville Beach - Part 1
Last weekend, we celebrated my birthday with a little trip to Wrightsville Beach and Wilmington, North Carolina. It was such a simple, sweet weekend with my little family yet I felt overwhelmed by how much God has blessed me.
We saw a beautiful sunset on our first night in town. This is near our hotel in Downtown Wilmington, which was next to the Cape Fear River. (Side note: do you remember that scary movie, Cape Fear? Whenever I hear the name of the river, I think of that creepy guy under the car.)
Back to the pretty sunset. =) See the U.S.S. North Carolina reflecting the sunset on the left side of this next picture?
The next day was my actual birthday and we spent the morning at the beach. Check out our photos from Wrighstville Beach here, but for now here are a few from my afternoon wanderings around Downtown Wilmington.
During Little Sweets' naptime, my Sweets (who is definitely a WonderDad, by the way) offered to stay at the hotel so I could have some relaxing time to myself. Is it sad that I was really excited to have some alone time on my birthday? I'm sure most moms can understand that. =)
While I was strolling, the skies opened and there was a huge thunderstorm, so these pictures made the town look very dreamy. For those of you who have never been to the Southern United States, it stays very warm on rainy days (it was over 90 degrees Fahrenheit). It was so humid that my camera lens kept fogging up.
I'll leave you with one more glimpse at the Battleship North Carolina. Pictures from the beach are coming soon!
We saw a beautiful sunset on our first night in town. This is near our hotel in Downtown Wilmington, which was next to the Cape Fear River. (Side note: do you remember that scary movie, Cape Fear? Whenever I hear the name of the river, I think of that creepy guy under the car.)
Back to the pretty sunset. =) See the U.S.S. North Carolina reflecting the sunset on the left side of this next picture?
The next day was my actual birthday and we spent the morning at the beach. Check out our photos from Wrighstville Beach here, but for now here are a few from my afternoon wanderings around Downtown Wilmington.
During Little Sweets' naptime, my Sweets (who is definitely a WonderDad, by the way) offered to stay at the hotel so I could have some relaxing time to myself. Is it sad that I was really excited to have some alone time on my birthday? I'm sure most moms can understand that. =)
While I was strolling, the skies opened and there was a huge thunderstorm, so these pictures made the town look very dreamy. For those of you who have never been to the Southern United States, it stays very warm on rainy days (it was over 90 degrees Fahrenheit). It was so humid that my camera lens kept fogging up.
I'll leave you with one more glimpse at the Battleship North Carolina. Pictures from the beach are coming soon!
Wednesday, July 27, 2011
Watermelon Slushy Tutorial
I (like most people, I'm sure) hate throwing away food. So when I chopped up a giant watermelon for a BBQ and had a ton leftover, I decided to make it into a Watermelon Slushy and freeze it for later. This is a great summertime treat to enjoy with the kids while they play with their Rainbow Ice!
This recipe comes from Woman's Day's August 2011 issue. I made this twice, the first time exactly as directed, adding sugar water. The second time, I tried it without sugar water and it was delicious (and I have a sweet tooth). So forgo the sugar and make another all-fruit healthy snack for the kids!
Are you a visual learner? If so, here's how to make this summertime treat:
Oops--not pictured: strain the juice as you pour it into your dish so you won't get the seeds!
Now for those of you who prefer the directions written out step-by-step...
First, chop the watermelon. It doesn't have to be neatly cubed like this, these are the leftovers from the BBQ I was telling you about.
Puree in your blender or food processor. You may need to add a bit of water to help it blend. Then, strain it as your pour into a glass dish. Cover the dish with plastic wrap and freeze.
When it's solid, take it out of the freezer and let it defrost for awhile, then take a fork to it and scrape away! You can scrape it like you see in this photo, or (especially if you're doing a larger batch), chip away at it with your fork held vertically.
Try not to make too big of a mess getting it into your glasses, and munch away while you enjoy these last few weeks of summer!
Does it make your mouth water just looking at it?
You may be wondering: how much does this make? These two glasses were the yield from 1/2 of a medium-sized watermelon. If you do a giant watermelon, the scraping/chipping away process will take much longer. Let it defrost or put the dish in some hot water and patiently wait for up to 20 minutes before trying to scrape.
Hmmm... what other fruits would make a good slushy?
This recipe comes from Woman's Day's August 2011 issue. I made this twice, the first time exactly as directed, adding sugar water. The second time, I tried it without sugar water and it was delicious (and I have a sweet tooth). So forgo the sugar and make another all-fruit healthy snack for the kids!
Ingredients for Watermelon Slushy:
Watermelon, chopped
Water (maybe)
Are you a visual learner? If so, here's how to make this summertime treat:
Oops--not pictured: strain the juice as you pour it into your dish so you won't get the seeds!
Now for those of you who prefer the directions written out step-by-step...
First, chop the watermelon. It doesn't have to be neatly cubed like this, these are the leftovers from the BBQ I was telling you about.
Puree in your blender or food processor. You may need to add a bit of water to help it blend. Then, strain it as your pour into a glass dish. Cover the dish with plastic wrap and freeze.
When it's solid, take it out of the freezer and let it defrost for awhile, then take a fork to it and scrape away! You can scrape it like you see in this photo, or (especially if you're doing a larger batch), chip away at it with your fork held vertically.
Try not to make too big of a mess getting it into your glasses, and munch away while you enjoy these last few weeks of summer!
Does it make your mouth water just looking at it?
You may be wondering: how much does this make? These two glasses were the yield from 1/2 of a medium-sized watermelon. If you do a giant watermelon, the scraping/chipping away process will take much longer. Let it defrost or put the dish in some hot water and patiently wait for up to 20 minutes before trying to scrape.
Hmmm... what other fruits would make a good slushy?
Wednesday, July 20, 2011
A Long Weekend in the Country
It's been a few weeks since my Tips for Traveling With Tots series ended but I've still got travel on my mind. I've never spent a "long weekend in the country" but for some reason, that's where my wanderlust has taken my mind lately...
Where would you go if you had a long weekend away?
1. (Background Art) Under the apple tree Print by irenesuchocki
Where would you go if you had a long weekend away?
Friday, July 15, 2011
Rainbow Ice - Tutorial
We spend a lot of time outdoors in the hot, humid North Carolina summers. Little Sweets' favorite toy last summer was her water table and it's proving to be again this year. A few weeks ago, I decided to add something different to her water table -- Rainbow Ice!
She loves these Rainbow Ice Cubes and was so sad when they were all melted. Next time I'll make a bigger batch!
This would be a great kids' summer camp idea. Older kids can have a great hands-on (literally) learning experience about mixing primary colors and the changing states of matter from liquid to ice. Science or Art Class?
Make sure that your cookie sheet will fit in your freezer before you start this project. You will make life much easier on yourself if you do it now. Also, your plastic "molds" should be cheap and/or old just in case they crack when you drop it on the ground as you're taking it out of the freezer. (I'm speaking from experience.)
The star of the show here is Crayola's Color Bath Dropz. You can buy these at Target or Wal-Mart in the baby bath section for a few dollars. They are non-toxic, fragrance free and are meant for children at least 3 years of age. Obviously, they're meant for the bath and Rainbow Ice would be fun for bathtime, too! But why not add them to your water table or baby pool?
Fill each bowl with about 3 or 4 cups of water. No need to measure but the less water, the more intense the color. This is a good thing, but if you spill on your way to the freezer, you might end up with a blue carpet. Remember these Dropz are intended to be used in a bath tub with much much more water.
After a few minutes, the Dropz will be dissolved. You don't need to use hot water and there's no need to stir.
Now put your empty "molds" on the cookie sheet to make it easier to move to the freezer without spilling all over the place. Then, carefully pour some water into each mold. Remember what we learned in grade school about mixing primary colors to make secondary (and tertiary) colors? Just fill it halfway with yellow and the rest of the way with red if you want to make orange, for example. No need to stir.
I filled up each bowl with 2-3 ladles of water and each compartment of the small ice cube tray with 3-4 spoonfuls of water. Don't try to pour your big bowls of water to fill these tiny trays. =)
Then move your cookie sheet into the freezer (see why you want to make sure that cookie sheet fits in your freezer before you start this project?) and wait until they're frozen.
I loved how these little ice cubes looked, but they melted so fast outside that next time I'll probably just do the bowls. The Rainbow Ice will lose a bit of its brightness when frozen, as you can see here:
Once they're frozen, unmold them (you may want to put some warm water in the tray to loosen a bit first). Fair warning: your hands will probably be rainbow-colored when you touch them but it easily washes off.
Then rush outside to play or store in freezer zip-top bags for later. Put them in your little sweeties' water table, baby pool or bathtub and get your camera ready!
She was so excited that the water turned purple (Mommy's favorite color)!
The blue star ice cube was her favorite.
I would love to see what shapes and colors you can come up with. Let me know if you make these and show off your pictures!
She loves these Rainbow Ice Cubes and was so sad when they were all melted. Next time I'll make a bigger batch!
This would be a great kids' summer camp idea. Older kids can have a great hands-on (literally) learning experience about mixing primary colors and the changing states of matter from liquid to ice. Science or Art Class?
Here's what you need to make Colored Ice Cubes:
Color Bath Dropz by Crayola
water
ice cube trays and/or old plastic bowls, bath toys, or anything you can fill up with water
3 large bowls
spoon or ladle
cookie sheet that fits in your freezer
Make sure that your cookie sheet will fit in your freezer before you start this project. You will make life much easier on yourself if you do it now. Also, your plastic "molds" should be cheap and/or old just in case they crack when you drop it on the ground as you're taking it out of the freezer. (I'm speaking from experience.)
The star of the show here is Crayola's Color Bath Dropz. You can buy these at Target or Wal-Mart in the baby bath section for a few dollars. They are non-toxic, fragrance free and are meant for children at least 3 years of age. Obviously, they're meant for the bath and Rainbow Ice would be fun for bathtime, too! But why not add them to your water table or baby pool?
Fill each bowl with about 3 or 4 cups of water. No need to measure but the less water, the more intense the color. This is a good thing, but if you spill on your way to the freezer, you might end up with a blue carpet. Remember these Dropz are intended to be used in a bath tub with much much more water.
After a few minutes, the Dropz will be dissolved. You don't need to use hot water and there's no need to stir.
Now put your empty "molds" on the cookie sheet to make it easier to move to the freezer without spilling all over the place. Then, carefully pour some water into each mold. Remember what we learned in grade school about mixing primary colors to make secondary (and tertiary) colors? Just fill it halfway with yellow and the rest of the way with red if you want to make orange, for example. No need to stir.
I filled up each bowl with 2-3 ladles of water and each compartment of the small ice cube tray with 3-4 spoonfuls of water. Don't try to pour your big bowls of water to fill these tiny trays. =)
Then move your cookie sheet into the freezer (see why you want to make sure that cookie sheet fits in your freezer before you start this project?) and wait until they're frozen.
I loved how these little ice cubes looked, but they melted so fast outside that next time I'll probably just do the bowls. The Rainbow Ice will lose a bit of its brightness when frozen, as you can see here:
Then rush outside to play or store in freezer zip-top bags for later. Put them in your little sweeties' water table, baby pool or bathtub and get your camera ready!
The blue star ice cube was her favorite.
I would love to see what shapes and colors you can come up with. Let me know if you make these and show off your pictures!
Thursday, June 16, 2011
A Star-Spangled (Paint Chip) Banner - Tutorial
To celebrate the 4th of July this year, I made my own Star-Spangled Banner:
If my mantle looks familiar, you've seen it before with the paint chip Easter egg garland, which was inspired by Modern Parents, Messy Kids.
I'm writing up my own tutorial on this one, since I used a sewing machine instead of doing it by hand. I realized recently how much I dislike sewing by hand! If you've used a sewing machine, you should be able to do this project since it's just a basic straight stitch. If not, do it by hand and it will be just as cute!
Trace the star shape onto your paint chips and cut out as many as you want for your banner.
Then admire how patriotic all the stars look:
Okay back to work. It's time to sew now. I had more red and blue stars than white so I used a pattern of red-blue-red-blue-white, repeat.
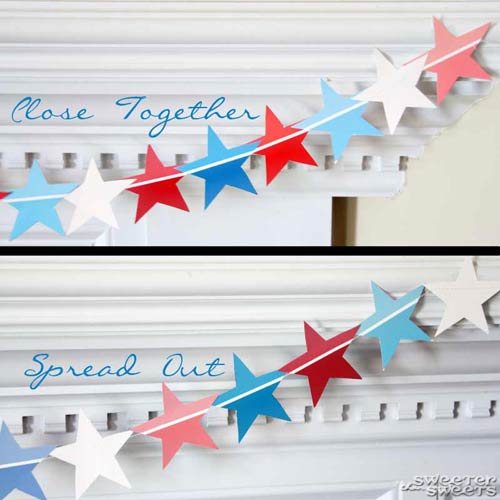
There are a couple of ways you can sew these together as far as the spacing goes. I tried both and you'll see my results in a minute. The first way is to line them up right next to each other as you sew so they're close together and overlapping just a bit.
Or you can leave a small amount of space in between each star as you sew so they're more spread out. You don't want the gap to be too big because it will be more likely that they'll flip upside down when it's hanging.
I think I like the spread-out look better but the side that I made close together was definitely easier to hang. Can you see the difference?
While you're sewing, be careful how the already-sewn stars fall since you don't want a big jumbled mess when you're done. Then find somewhere to hang your Star-Spangled (Paint Chip) Banner!
So festive and easy to make. This is a quick 1-naptime craft for all you mommies out there!
Think about all the possibilities with this craft: You could make stars to hang above baby's crib as a mobile (double-sided so the backs are pretty too), decorate a birthday party table in your theme colors (sewn together as a banner or just as giant star-shaped "confetti")... so many options.
I'd love to see your version if you make one--leave a comment with your link if you blog about yours!
(Also check out this festive Korker Cake Garland I made for the 4th, my first guest post over at The CSI Project!)
If my mantle looks familiar, you've seen it before with the paint chip Easter egg garland, which was inspired by Modern Parents, Messy Kids.
I'm writing up my own tutorial on this one, since I used a sewing machine instead of doing it by hand. I realized recently how much I dislike sewing by hand! If you've used a sewing machine, you should be able to do this project since it's just a basic straight stitch. If not, do it by hand and it will be just as cute!
What you need to make a Star-Spangled (Paint Chip) Banner:
paint chips in red, white and blue
scissors
cardboard to cut out a star-shaped template
sewing machine (optional)
white thread
double-sided tape for hanging
I used 21 paint chips total, 7 of each color. Don't worry if some of the red paint chips look pink--you will get the overall look of red, white and blue when it all comes together.
First you want to make yourself a star-shaped template out of your piece of cardboard. I traced one of Little Sweet's star shapes from a foam puzzle, then tweaked the size a bit to fit 2 stars on each paint chip. You could also draw your own or print out a star shape from Photoshop.
You want the white line to be close to the widest part of your star since you'll be sewing directly over that white line to give it some stability:
Trace the star shape onto your paint chips and cut out as many as you want for your banner.
Then admire how patriotic all the stars look:
Okay back to work. It's time to sew now. I had more red and blue stars than white so I used a pattern of red-blue-red-blue-white, repeat.
There are a couple of ways you can sew these together as far as the spacing goes. I tried both and you'll see my results in a minute. The first way is to line them up right next to each other as you sew so they're close together and overlapping just a bit.
Or you can leave a small amount of space in between each star as you sew so they're more spread out. You don't want the gap to be too big because it will be more likely that they'll flip upside down when it's hanging.
I think I like the spread-out look better but the side that I made close together was definitely easier to hang. Can you see the difference?
While you're sewing, be careful how the already-sewn stars fall since you don't want a big jumbled mess when you're done. Then find somewhere to hang your Star-Spangled (Paint Chip) Banner!
So festive and easy to make. This is a quick 1-naptime craft for all you mommies out there!
Think about all the possibilities with this craft: You could make stars to hang above baby's crib as a mobile (double-sided so the backs are pretty too), decorate a birthday party table in your theme colors (sewn together as a banner or just as giant star-shaped "confetti")... so many options.
I'd love to see your version if you make one--leave a comment with your link if you blog about yours!
Subscribe to:
Posts (Atom)