


This tutorial is going to give you directions for a tube top like this (stretchy, knit fabric with no seams) along with ideas for adaptations:

You can adapt it to work for your old tube tops or your thrift store finds. Just make sure if you're sewing a knit fabric that you use a ballpoint needle in your sewing machine.
Here's a "before" shot of me wearing it 7 years ago:
First, put it on your little model and using clothespins, clip it to the right size. Don't worry about whether it's done neatly, you're just trying to figure out what the finished length and width should be.
You can also use a store-bought tunic in the correct size to see what the finished measurements should be.
Now lay it out flat to measure the length and width. Right down the numbers somewhere so you don't forget later, then unclip it. We're going to work on getting the width right first, then the length.
(Little Sweets wears 2T or 3T and the finished measurements for her were 16" long and 9" wide.)

Now calculate how many inches you need to cut out of it to get it to the right finished width. Since I wanted to it to measure 9" across when finished and it started out at 17", I cut out 7". I included a generous 1" buffer, just in case my measurements were off (better to cut out too little than too much!).
Like I said, my tube top was seamless, so I got to pick where I wanted the seam to be. I decided it would be in the middle of the back since that would be easier than doing two down the sides. So I cut out the extra 7" from the middle. I used pins to mark where I was going to cut (my tailor's chalk wouldn't write on this fabric or I would've just marked it that way). I hope the picture explains this better:

(If you already have two seams down the sides, you can cut those and the extra material out from the sides to get the right width--in this case it would've been 3.5" from each side.)
Here's another picture to explain this part. On the left you can see where I pinned to get rid of those extra 7". I decided to sew down those lines before cutting because I didn't want the ruching to unravel. On the right, you can see what it looked like after it was sewn:

Then cut out the extra fabric and save it so you can make straps later.

Now, fold it in half lengthwise with right sides together and raw edges aligned. Pin in place and sew to create the seam in the back.

Now it's the right width and we need to work on the length. My tube top had an empire waist so I cut it into two pieces right at the bottom of the ruching. (If your tube top doesn't have details like this empire waist and ruching, the easiest way to do this part would be to cut off some fabric from the bottom and do a simple hem--and you'd be done!)

I wanted the ruched part to be 5" long to get the correct finished length of 16", so I measured and marked with a pin where to cut and sew (remember your seam allowance.)

Now you can sew along the marked line.
Oops! I realized after I sewed it that I did it wrong. Time for the seam ripper (it gets a lot of use in my house).

What did I do wrong? I sewed it like I usually sew quilting fabric, making sure not to pull on it. But this fabric is stretchy and I needed to pull it while sewing to make sure that it would stay stretchy. Here's the right way... see how it's pulled taut? That will allow it to stretch after it's sewn.

(I added this extra step of sewing along the cut edge before I sewed the two parts together to make sure that the ruching didn't unravel. If you know how to sew and your fabric is just a regular cotton/knit, you can skip this extra step.)
Okay now it's time to put the top and bottom together. This next photo shows how to start putting it together, with ride sides facing and the seams aligned:
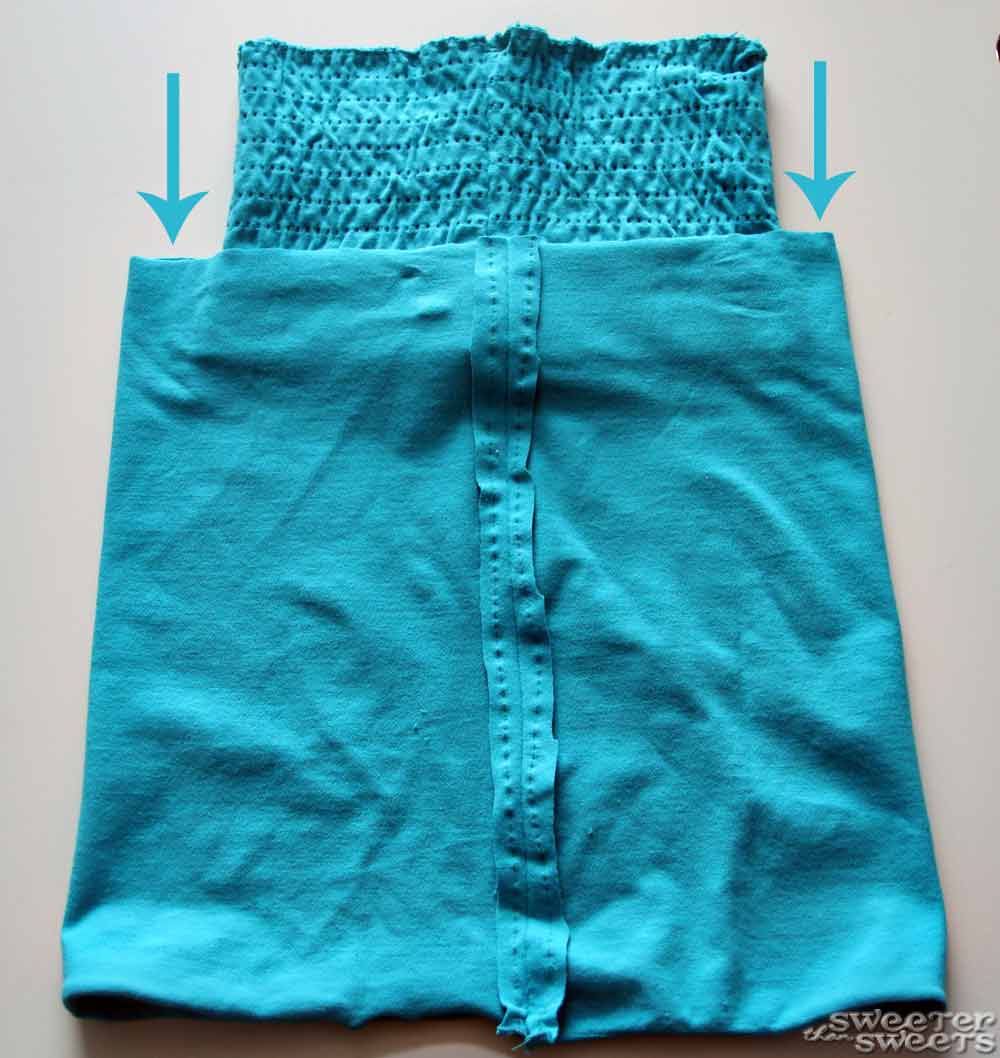
Tuck the top part all the way into the bottom part and align the cut edges. Since the top is clearly narrower than the bottom, you'll need to do some more stretching as you sew. To do that, first pin where the seams are aligned (in the back) like you see in the next photo. Then pin on the other side (the front). Then stretch it evenly and add a pin on each side. This will show you how much you need to stretch as you sew.

Hope that makes sense. If not, keep your seam ripper handy! Nothing wrong with trial and error when you're sewing. =) When the two parts are sewn together it should look like this and it should be the right length and width:

Go back to the piece you cut out and cut some pieces long enough for straps. You may need to measure your model (or correctly-sized tunic) for this. I chose to gather the ends of each strap to add a little flair so I cut the straps much wider than they needed to be. See Step 2 of this tutorial to learn how to gather if you've never tried it before--it's very easy!

Put the tunic on your model and pin the straps where they should be... Little Sweets sits motionless when the TV is on so I knew that would be the perfect way to get this part done. Just be careful with the sharp pins, especially when you take it off! I liked the idea of cris-crossing the straps since I had long enough pieces of fabric left over.

Flip the tunic inside-out and carefully move the pins to the other side so you can see them as you sew. This photo shows it before I moved the pins to the other side:

Sew above the gathered seam (I sewed in the ditch where the ruching starts in order to hide the seam), then remove the gathering threads and trim the extra material. And here it is:

All done! Now your favorite tube top (or thrifted find!) can have a second life as a cute toddler tunic.
I love the cris-crossed straps in the back.

With the gathered straps, you can stretch them out to make the straps look more like cap-sleeves than tank top straps too! Looks like Little Sweets likes wearing Mommy's old tube top. I hope your little one likes it, too!

What a great way to upcycle such a cute top! She looks adorable :) (And you looked great in it too!)
ReplyDeleteHi Tricia!
ReplyDeletethat is a fantastic tutorial! What a great way to repurpose an old tube top ~ and your little girl looks absolutely adorable in it!!
And thank you for the tutorials link list,so kind of you to share:)
best wishes,
Duni
precious, tricia! was that photo from berit's baby shower? that's jolene's house, right? ahh, the memories! :)
ReplyDeleteEdi and Duni, Thanks for checking it out and for the sweet compliments!
ReplyDeleteGretchen, you are good! You probably took that pic too... I had to dig through a bunch of photos to find one of me wearing it and it was fun to see so many good memories of Hawaii! Miss you!
That turned out so cute! And I have to say that you have the cutest model around. Adorable!
ReplyDeleteSuch a cute refashion!! I have several tube tops that would look way cuter on my daughter than they do on me. Thanks for the inspiration!
ReplyDeleteJen @ My Own Road
www.jensownroad.blogspot.com
This is so adorable! Wish I still had a sweet toddler daughter (mine are teens and they are anything but sweet!) I just shared this on my twitter!
ReplyDeletei really like repurposing projects like this :)
ReplyDeleteI love it, and your little model is quite the cutie!
ReplyDelete~JamieS
Cute- love the refashion!!
ReplyDeleteI love this! Super cute!
ReplyDeleteI'd love for you to link up to our "Crafts for Under Twenty-Somethings" Thursdays this week! It's a blog hop specifically for kids and teens ideas, so your ideas would be perfect! I'll hope you'll come link up this Thursday.
bearrabbitbear.blogspot.com
Melanie
wow...so creative!
ReplyDeletexoxo
How cute! I love it!
ReplyDeletereally sweet on your daughter! What a great idea.
ReplyDeleteGrea ideas and tutorial, i like it very much. thanks
ReplyDeleteGreat tutorial! It will be great to get some new life into my old tube tops. They just don't look as good on me now that I'm a mom with some mommy pudges, but they would looks adorable on my daughter!
ReplyDeleteVery cute dress - I'd love to try and make something like that for my granddaughter. They are a great idea and always look good too.
ReplyDeleteWhat is your next project?
Love it! Gotta love a re-fashion :)
ReplyDeleteGreat idea! I am pulling that old tube top out of the Goodwill bag and putting it in my sewing pile. Thanks!
ReplyDeleteReally appreciate you linking up this awesome masterpiece at the Creative Bloggers' Party & Hop :)
ReplyDeleteWonderful color and you little sweet girl.... thanks a lot for the step by step.....greeting from Chile
ReplyDeleteWhat a rare talent indeed! I never thought it is not that difficult so and I'll try to do it too!
ReplyDeleteVery cute both you and your lovely daughter, it'saving idea at home. so good! ^^
ReplyDeletewhoah this weblog is great i really like studying your articles.Keep up the good work! I like the tunic tops for women its amazing.
ReplyDeleteThe designs which you have provided is very good. Who is looking for Casual Dresses for Women.
ReplyDeleteNice Article.
ReplyDeleteWomen's Tunic Tops are full of elegance with its designs and colors so these are popular worldwide.
Thank you for sharing your info. I truly appreciate your efforts and I am waiting for your next post thanks.. Womens Tops
ReplyDeletehttps://crackygame.com/rar-password-unlocker-crack-with-torrent-free-download/
ReplyDeleteRAR Password Unlocker Crack is the security software application used to allow multiple users to get access to their locking systems. This application supports the multiple kinds of programs that can provide multiple options to recover their files which locked. The stong brute force has the ability to even the user to get some parameters there. While this software application is much fast than you have ever expected. And most noteworthy, a thing of this application is that it does not take much time. Additionally, the application can be programmed to instantly power off your PC following the regaining of your password.
https://fullpcgameshere.com/hearthstone-for-pc-download-game-full-version/
ReplyDeleteHearthstone For Pc is an online fantasy game. This free to play is a digital card collecting game. Moreover, this fantastic game is made and released by Blizzard Entertainment. This game is the description of Heroes of Warcraft. However, the game is the knowledge about the Warcraft series. This uses the same material and the same characters used in Warcraft.
God gave you a gift of 86,400 seconds today. Have you used one to say, ‘thank you’
ReplyDeleteBitTorrent Pro Crack
BB FlashBack Pro Crack
4K Video Downloader Crack
This post is very helpful. thank you for sharing.
ReplyDeletefences 3 product key
Foxit PhantomPDF Business Crack
Any Video Downloader Pro Crack
You Can Also Download Free Software & Mac
ReplyDeletehttps://miancrack.com/emmc-dongle-crack/
Hi Thanks for your great website
ReplyDeletedownloadtradingsoftware.com
downloadtradingsoftware@gmail.com
Thanks
The post and the points made here are great.
ReplyDeletehttps://crackspick.com/ni-labview-download/
Your Blog Is Nice. It has all information about software. Thanks for Shearing!
ReplyDeleteClick hear
OH! finally the required information is attained, this is really proves good for mine.
ReplyDeletehttps://thepcsoft.com/hwidgen-digital-licence-activator-for-window-10/
Hey dear, I have read your post that you have also discussed here, I appreciate your hard work and urge you more information.
ReplyDeletediskinternals Crack
Do something that makes you comfortable, such as a massage while listening to music, which I like. Fill a bucket of water in a foot massager at home, put your feet in, turn on the music, feel the rolling of the soles of your feet, and heal in the music and warmth. Accept the setbacks, get yourself together and start again.
ReplyDelete